> ## Documentation Index
> Fetch the complete documentation index at: https://docs.conduktor.io/llms.txt
> Use this file to discover all available pages before exploring further.
# Deploy Console with Docker, Kubernetes, Helm
> Deploy Conduktor Console with Docker, Kubernetes (Helm), or docker-compose. Requires PostgreSQL. Covers TLS, environment variables, memory tuning, and proxy configuration.
Conduktor Console can be deployed and configured using either a configuration file `platform-config.yaml` or **environment variables**.
To set up your organization's environment:
1. Enter the organization's name.
2. Connect to an external database (**required**).
3. Set up user authentication (basic or SSO).
4. Apply your Console license.
We recommend using the Console UI (**Settings** > **Clusters** page) to configure Kafka cluster, schema registry and Kafka connect. This has several advantages over the YAML configuration:
* Intuitive interface with live update capabilities
* Centralized and secured with RBAC and audit logs events
* Certificate store to help with custom certificates configuration (no more JKS files and volume mounts)
[Check out the recommended deployment on GitHub](https://github.com/conduktor/conduktor-reference-architecture) .
### Security considerations
* The configuration file should be protected by file system permissions.
* The database should have at-rest data encryption enabled on the data volume and have limited network connectivity.
#### Configuration file
```yaml title="platform-config.yaml" theme={null}
organization:
name: demo
admin:
email: admin@company.io
password: admin
database:
url: postgresql://conduktor:change_me@host:5432/conduktor
# OR in a decomposed way
# host: "host"
# port: 5432
# name: "conduktor"
# username: "conduktor"
# password: "change_me"
# connection_timeout: 30 # in seconds
auth:
local-users:
- email: user@conduktor.io
password: user
license: ''
```
#### Bind file
The `docker-compose` below shows how to bind your **platform-config.yaml** file.
You can alternatively use environment variables. The `CDK_IN_CONF_FILE` variable is used to indicate that a configuration file is being used and the location to find it.
```yaml title="docker-compose.yaml" theme={null}
services:
postgresql:
image: postgres:14
hostname: postgresql
volumes:
- pg_data:/var/lib/postgresql/data
environment:
POSTGRES_DB: "conduktor"
POSTGRES_USER: "conduktor"
POSTGRES_PASSWORD: "change_me"
POSTGRES_HOST_AUTH_METHOD: "scram-sha-256"
conduktor-console:
image: conduktor/conduktor-console
depends_on:
- postgresql
ports:
- "8080:8080"
volumes:
- conduktor_data:/var/conduktor
- type: bind
source: "./platform-config.yaml"
target: /opt/conduktor/platform-config.yaml
read_only: true
environment:
CDK_IN_CONF_FILE: /opt/conduktor/platform-config.yaml
healthcheck:
test: curl -f http://localhost:8080/platform/api/modules/health/live || exit 1
interval: 10s
start_period: 10s
timeout: 5s
retries: 3
volumes:
pg_data: {}
conduktor_data: {}
```
#### Environment override
Input configuration fields can also be provided using environment variables. Here's an example of `docker-compose` that uses environment variables for configuration:
```yaml title="docker-compose.yaml theme={null}
services:
postgresql:
image: postgres:14
hostname: postgresql
volumes:
- pg_data:/var/lib/postgresql/data
environment:
POSTGRES_DB: "conduktor"
POSTGRES_USER: "conduktor"
POSTGRES_PASSWORD: "change_me"
POSTGRES_HOST_AUTH_METHOD: "scram-sha-256"
conduktor-console:
image: conduktor/conduktor-console
depends_on:
- postgresql
ports:
- "8080:8080"
volumes:
- conduktor_data:/var/conduktor
healthcheck:
test: curl -f http://localhost:8080/platform/api/modules/health/live || exit 1
interval: 10s
start_period: 10s
timeout: 5s
retries: 3
environment:
CDK_DATABASE_URL: "postgresql://conduktor:change_me@postgresql:5432/conduktor"
CDK_LICENSE: ""
CDK_ORGANIZATION_NAME: "demo"
CDK_ADMIN_EMAIL: "admin@company.io"
CDK_ADMIN_PASSWORD: "admin"
volumes:
pg_data: {}
conduktor_data: {}
```
### Container user and permissions
Console is running as a non-root user `conduktor-platform` with UID `10001` and GID `0`. All files inside the container volume `/var/conduktor` are owned by `conduktor-platform` user.
## Configure memory usage
We rely on container *CGroups limits* and use *up to 80%* of the container memory limit for JVM max heap size.
```bash theme={null}
-XX:+UseContainerSupport -XX:MaxRAMPercentage=80
```
You only need to care about the limits that you set on your container.
```yaml theme={null}
# Values.yaml
...
platform:
resources:
limits:
memory: 8Gi
...
```
```yaml theme={null}
# deployment.yaml
apiVersion: apps/v1
kind: Deployment
...
template:
spec:
containers:
- name: console
image: conduktor/conduktor-console
resources:
limits:
memory: 8G
...
```
```yaml theme={null}
# docker-compose.yaml
...
conduktor-console:
image: conduktor/conduktor-console
deploy:
resources:
limits:
memory: 8G
...
```
## Configure SSL or TLS
Depending on the environment, Conduktor might need to access external services (such as Kafka clusters, SSO servers, databases or object storage) that require a custom certificate for SSL/TLS communication.
You can configure this using:
* Console UI (recommended) - you can manage your certificates in a dedicated screen and configure SSL authentication from the broker setup wizard.
* volume mount - this method is only required if you have LDAPS. Do not use it for Kafka or Kafka components.
| | Kafka clusters | Schema registry / Kafka Connect | LDAPS, OIDC |
| ------------------------------ | -------------- | ------------------------------- | ------------- |
| SSL to secure data in transit | UI | UI | UI |
| SSL to authenticate the client | UI | UI | Not supported |
### Use the Conduktor certificate store
This option is recommended for Kafka, Kafka Connect and Schema Registry connections.
You can import and parse the certificates as text or files. The supported formats are:
* .crt
* .pem
* .jks
* .p12
#### Upload certificates
You can add cluster configurations from **Settings** > **Clusters** page. When you add the bootstrap server to your configuration, a check will be made to validate if the certificate is issued by a valid authority.
If the response indicates the certificate is not issued by a valid authority, you have two options:
* **Skip SSL Check**: This will skip validation of the SSL certificate on your server. This is an easy option for development environments with self-signed certificates
* **Upload Certificate**: This option will enable you to upload the certificate (`.crt`, `.pem`, `.jks` or `.p12` files), or paste the certificate as text
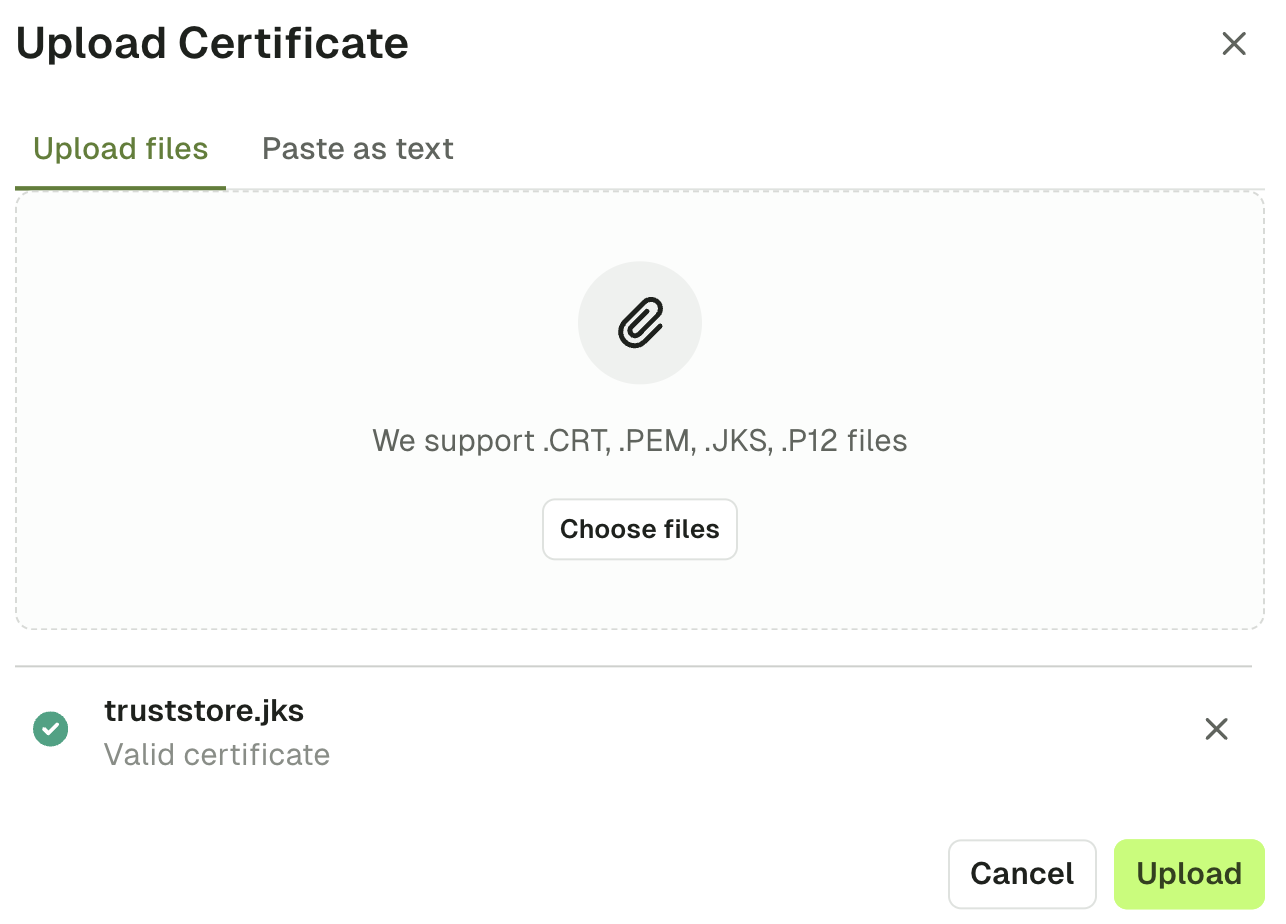 Upon uploading the certificate, you should then see the green icon indicating the **connection is secure**.
 #### Add truststores
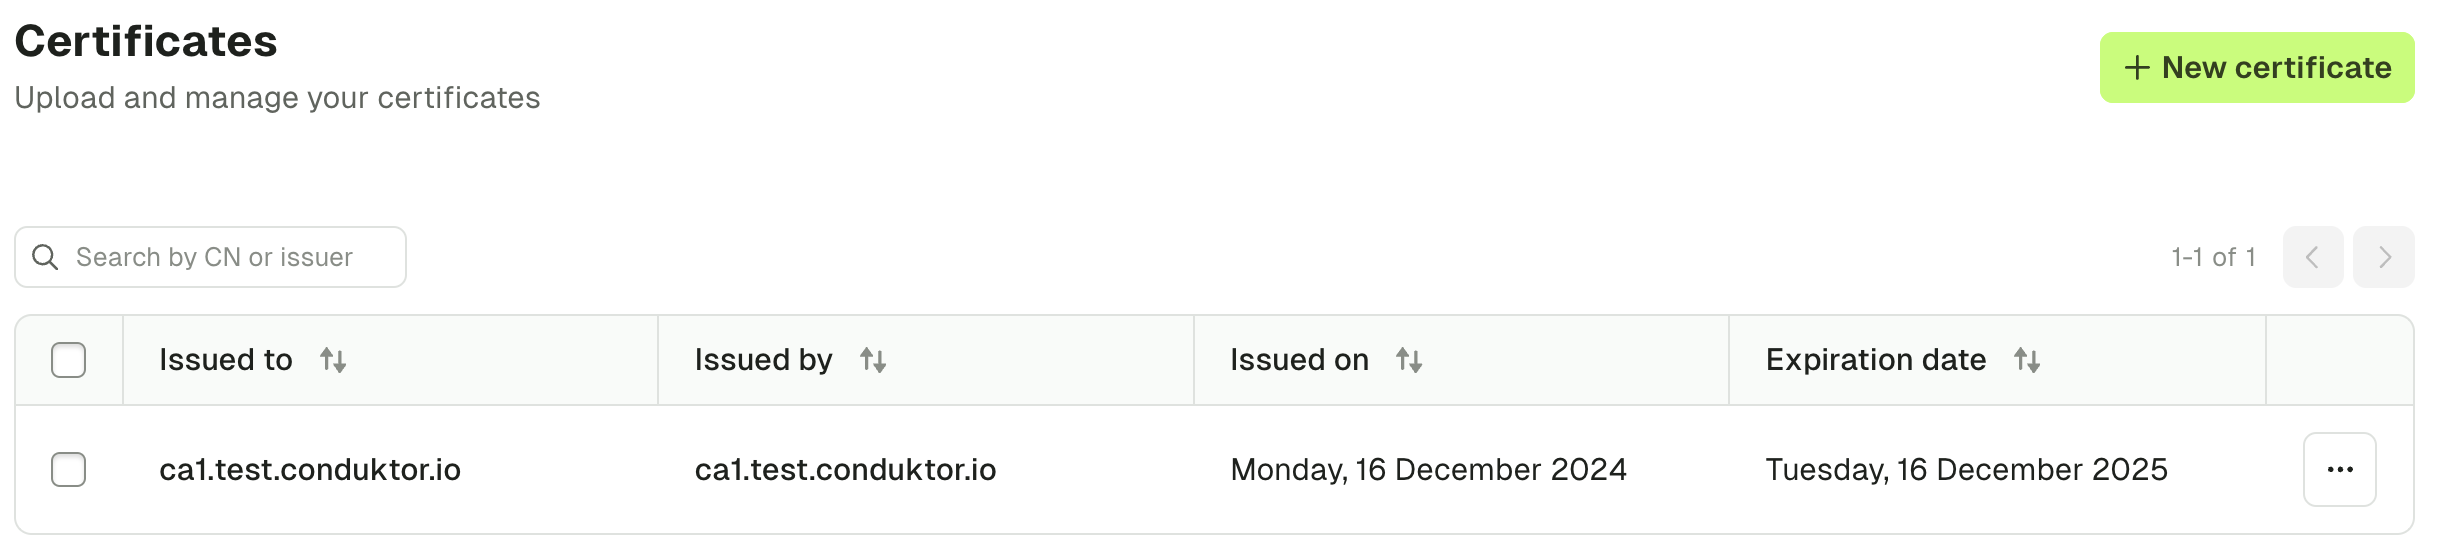
You can also manage organization truststores using the **Settings** > **Certificates** page. Simply add all of your certificates by uploading them or pasting them as text. In doing this, the SSL context will be derived when you configure Kafka, Kafka Connect and Schema Registry connections.
#### Add truststores
You can also manage organization truststores using the **Settings** > **Certificates** page. Simply add all of your certificates by uploading them or pasting them as text. In doing this, the SSL context will be derived when you configure Kafka, Kafka Connect and Schema Registry connections.
 #### Mount custom truststore
This option is recommended for SSO, DB or other external services requiring SSL/TLS communication.
Conduktor supports SSL/TLS connections using Java truststore.
#### Create TrustStore (JKS) from certificate in PEM format
If you already have a truststore, you can ignore this step.
You need a `keytool` program that is usually packaged on JDK distributions and a certificate in PEM format (`.pem` or `.crt`).
```bash theme={null}
keytool \
-importcert \
-noprompt \
-trustcacerts \
-keystore ./truststore.jks \ # Output truststore jks file
-alias "my-domain.com" \ # Certificate alias inside the truststore (usually the certificate subject)
-file ./my-certificate-file.pem \ # Input certificate file
-storepass changeit \ # Truststore password
-storetype JKS
```
#### Configure custom truststore via Conduktor Console
Mount the truststore file into the `conduktor-console` container and pass the correct environment variables for locating truststore file inside the container (and password, if needed).
If the truststore file is `truststore.jks` with password `changeit`, mount truststore file into `/opt/conduktor/certs/truststore.jks` inside the container.
If run from Docker :
```bash theme={null}
docker run --rm \
--mount "type=bind,source=$PWD/truststore.jks,target=/opt/conduktor/certs/truststore.jks" \
-e CDK_SSL_TRUSTSTORE_PATH="/opt/conduktor/certs/truststore.jks" \
-e CDK_SSL_TRUSTSTORE_PASSWORD="changeit" \
conduktor/conduktor-console
```
From docker-compose :
```yaml theme={null}
services:
conduktor-console:
image: conduktor/conduktor-console
ports:
- 8080:8080
volumes:
- type: bind
source: ./truststore.jks
target: /opt/conduktor/certs/truststore.jks
read_only: true
environment:
CDK_SSL_TRUSTSTORE_PATH: '/opt/conduktor/certs/truststore.jks'
CDK_SSL_TRUSTSTORE_PASSWORD: 'changeit'
```
#### Client certificate authentication
This option is recommended for mTLS.
This mechanism uses TLS protocol to authenticate the client. Also known as:
* Mutual SSL, Mutual TLS, mTLS
* Two-Way SSL, SSL Certificate Authentication
* Digital Certificate Authentication, Public Key Infrastructure (PKI) Authentication
#### Use the UI (keystore method)
Use the keystore file from your Kafka admin or provider (in **.jks** or **.p12** format).
Click the "Import from keystore" button to select a keystore file from your filesystem.
#### Mount custom truststore
This option is recommended for SSO, DB or other external services requiring SSL/TLS communication.
Conduktor supports SSL/TLS connections using Java truststore.
#### Create TrustStore (JKS) from certificate in PEM format
If you already have a truststore, you can ignore this step.
You need a `keytool` program that is usually packaged on JDK distributions and a certificate in PEM format (`.pem` or `.crt`).
```bash theme={null}
keytool \
-importcert \
-noprompt \
-trustcacerts \
-keystore ./truststore.jks \ # Output truststore jks file
-alias "my-domain.com" \ # Certificate alias inside the truststore (usually the certificate subject)
-file ./my-certificate-file.pem \ # Input certificate file
-storepass changeit \ # Truststore password
-storetype JKS
```
#### Configure custom truststore via Conduktor Console
Mount the truststore file into the `conduktor-console` container and pass the correct environment variables for locating truststore file inside the container (and password, if needed).
If the truststore file is `truststore.jks` with password `changeit`, mount truststore file into `/opt/conduktor/certs/truststore.jks` inside the container.
If run from Docker :
```bash theme={null}
docker run --rm \
--mount "type=bind,source=$PWD/truststore.jks,target=/opt/conduktor/certs/truststore.jks" \
-e CDK_SSL_TRUSTSTORE_PATH="/opt/conduktor/certs/truststore.jks" \
-e CDK_SSL_TRUSTSTORE_PASSWORD="changeit" \
conduktor/conduktor-console
```
From docker-compose :
```yaml theme={null}
services:
conduktor-console:
image: conduktor/conduktor-console
ports:
- 8080:8080
volumes:
- type: bind
source: ./truststore.jks
target: /opt/conduktor/certs/truststore.jks
read_only: true
environment:
CDK_SSL_TRUSTSTORE_PATH: '/opt/conduktor/certs/truststore.jks'
CDK_SSL_TRUSTSTORE_PASSWORD: 'changeit'
```
#### Client certificate authentication
This option is recommended for mTLS.
This mechanism uses TLS protocol to authenticate the client. Also known as:
* Mutual SSL, Mutual TLS, mTLS
* Two-Way SSL, SSL Certificate Authentication
* Digital Certificate Authentication, Public Key Infrastructure (PKI) Authentication
#### Use the UI (keystore method)
Use the keystore file from your Kafka admin or provider (in **.jks** or **.p12** format).
Click the "Import from keystore" button to select a keystore file from your filesystem.
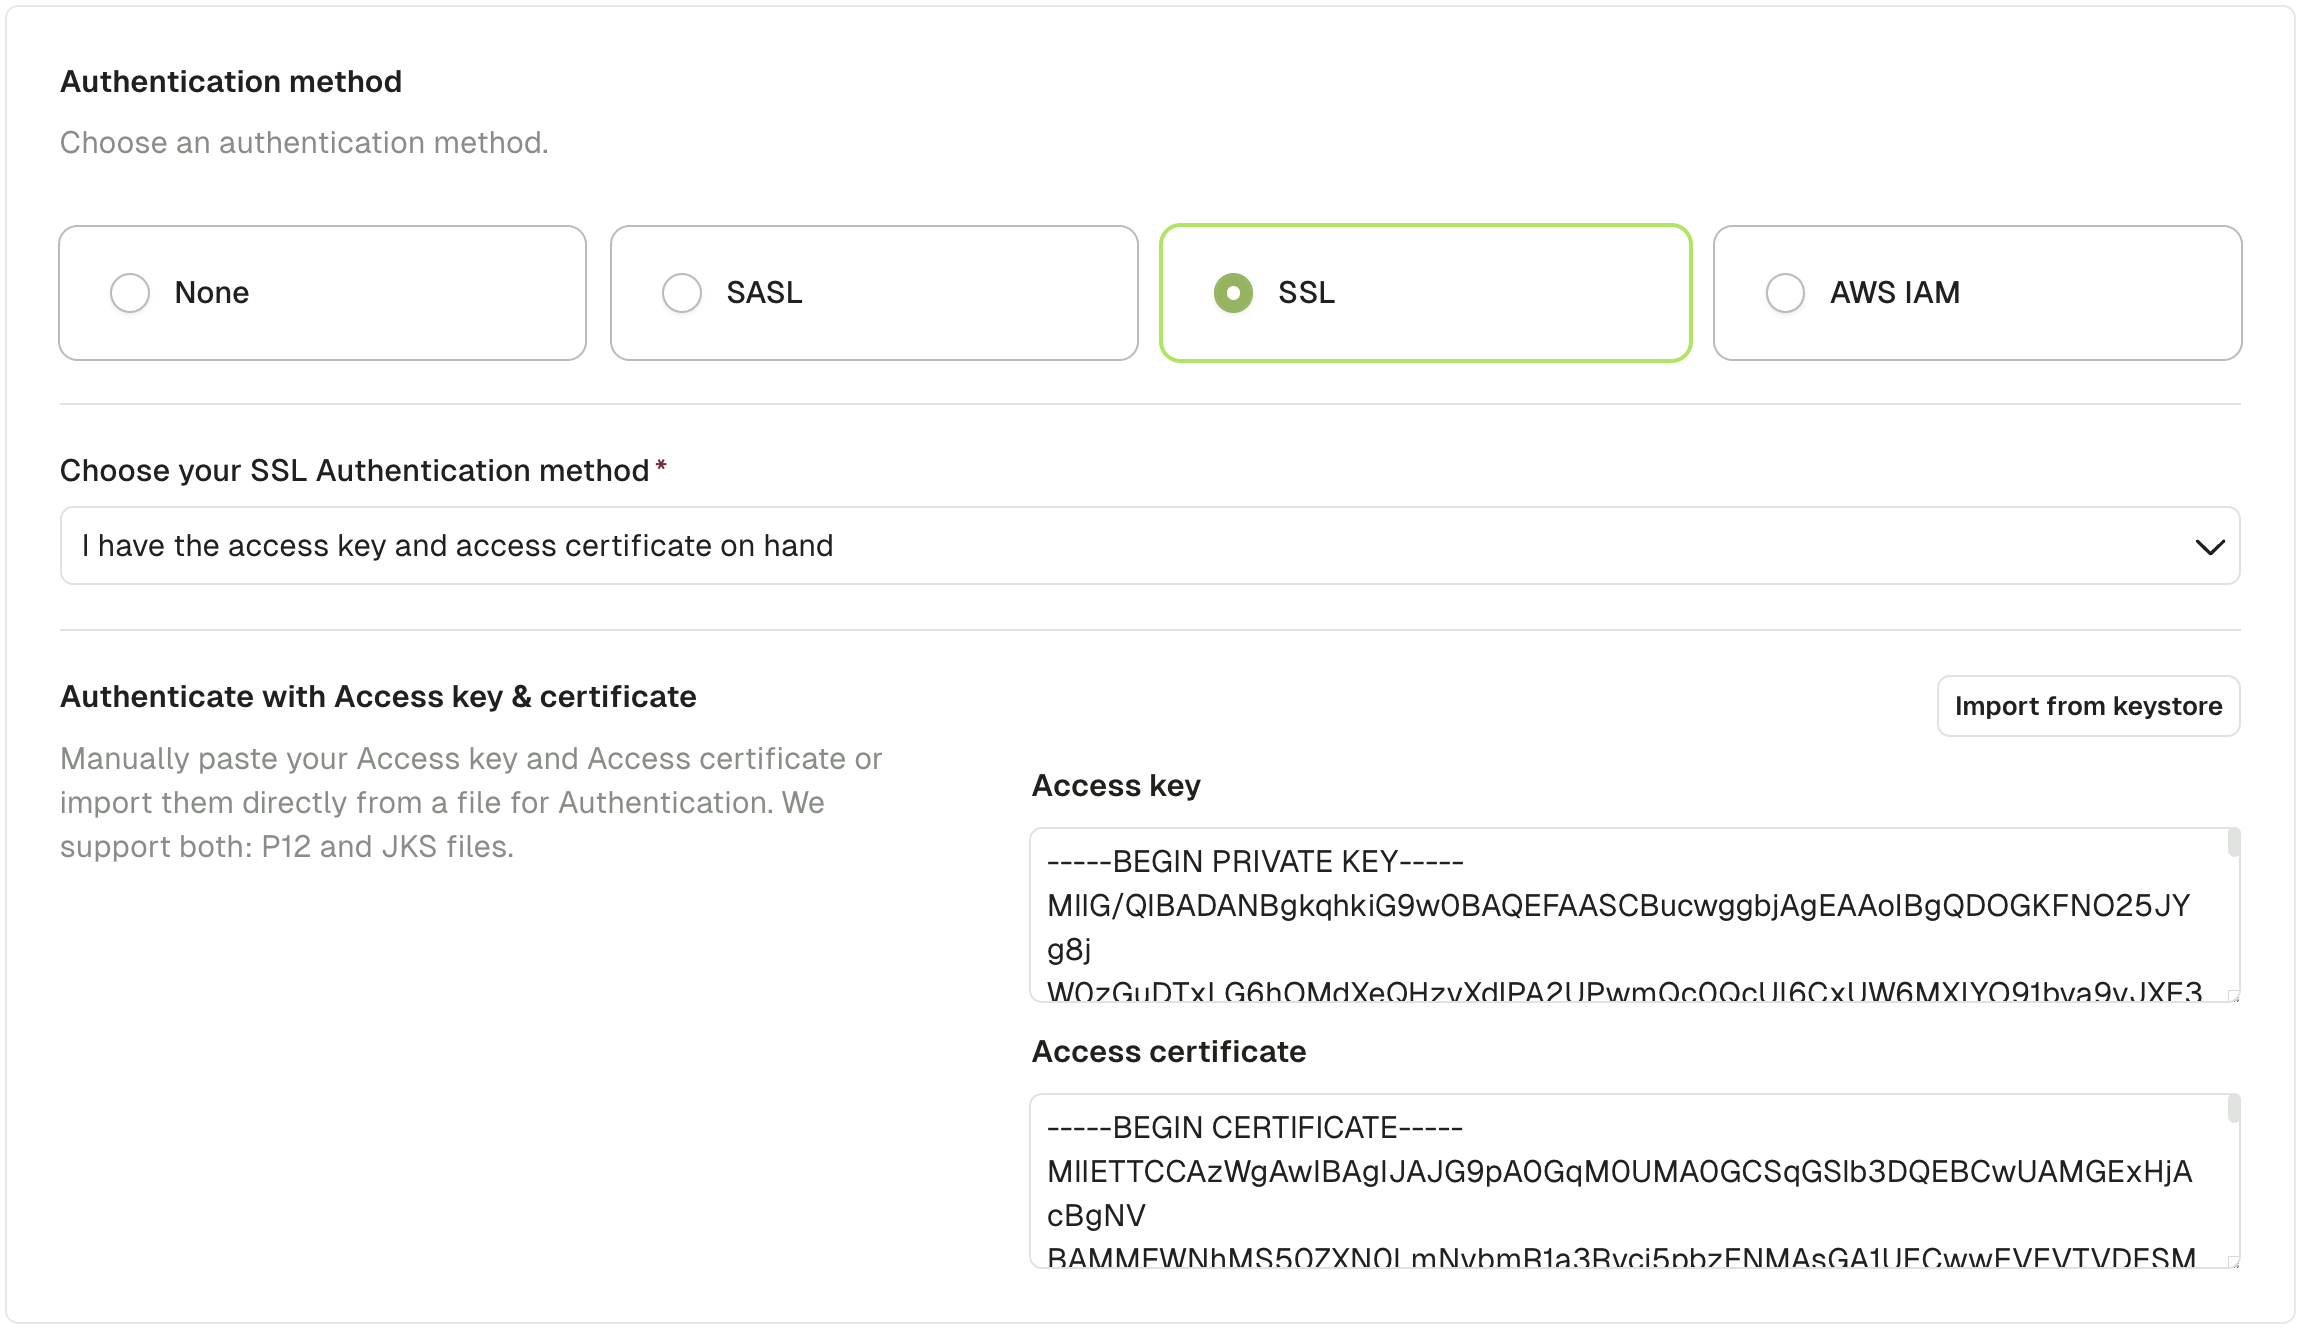
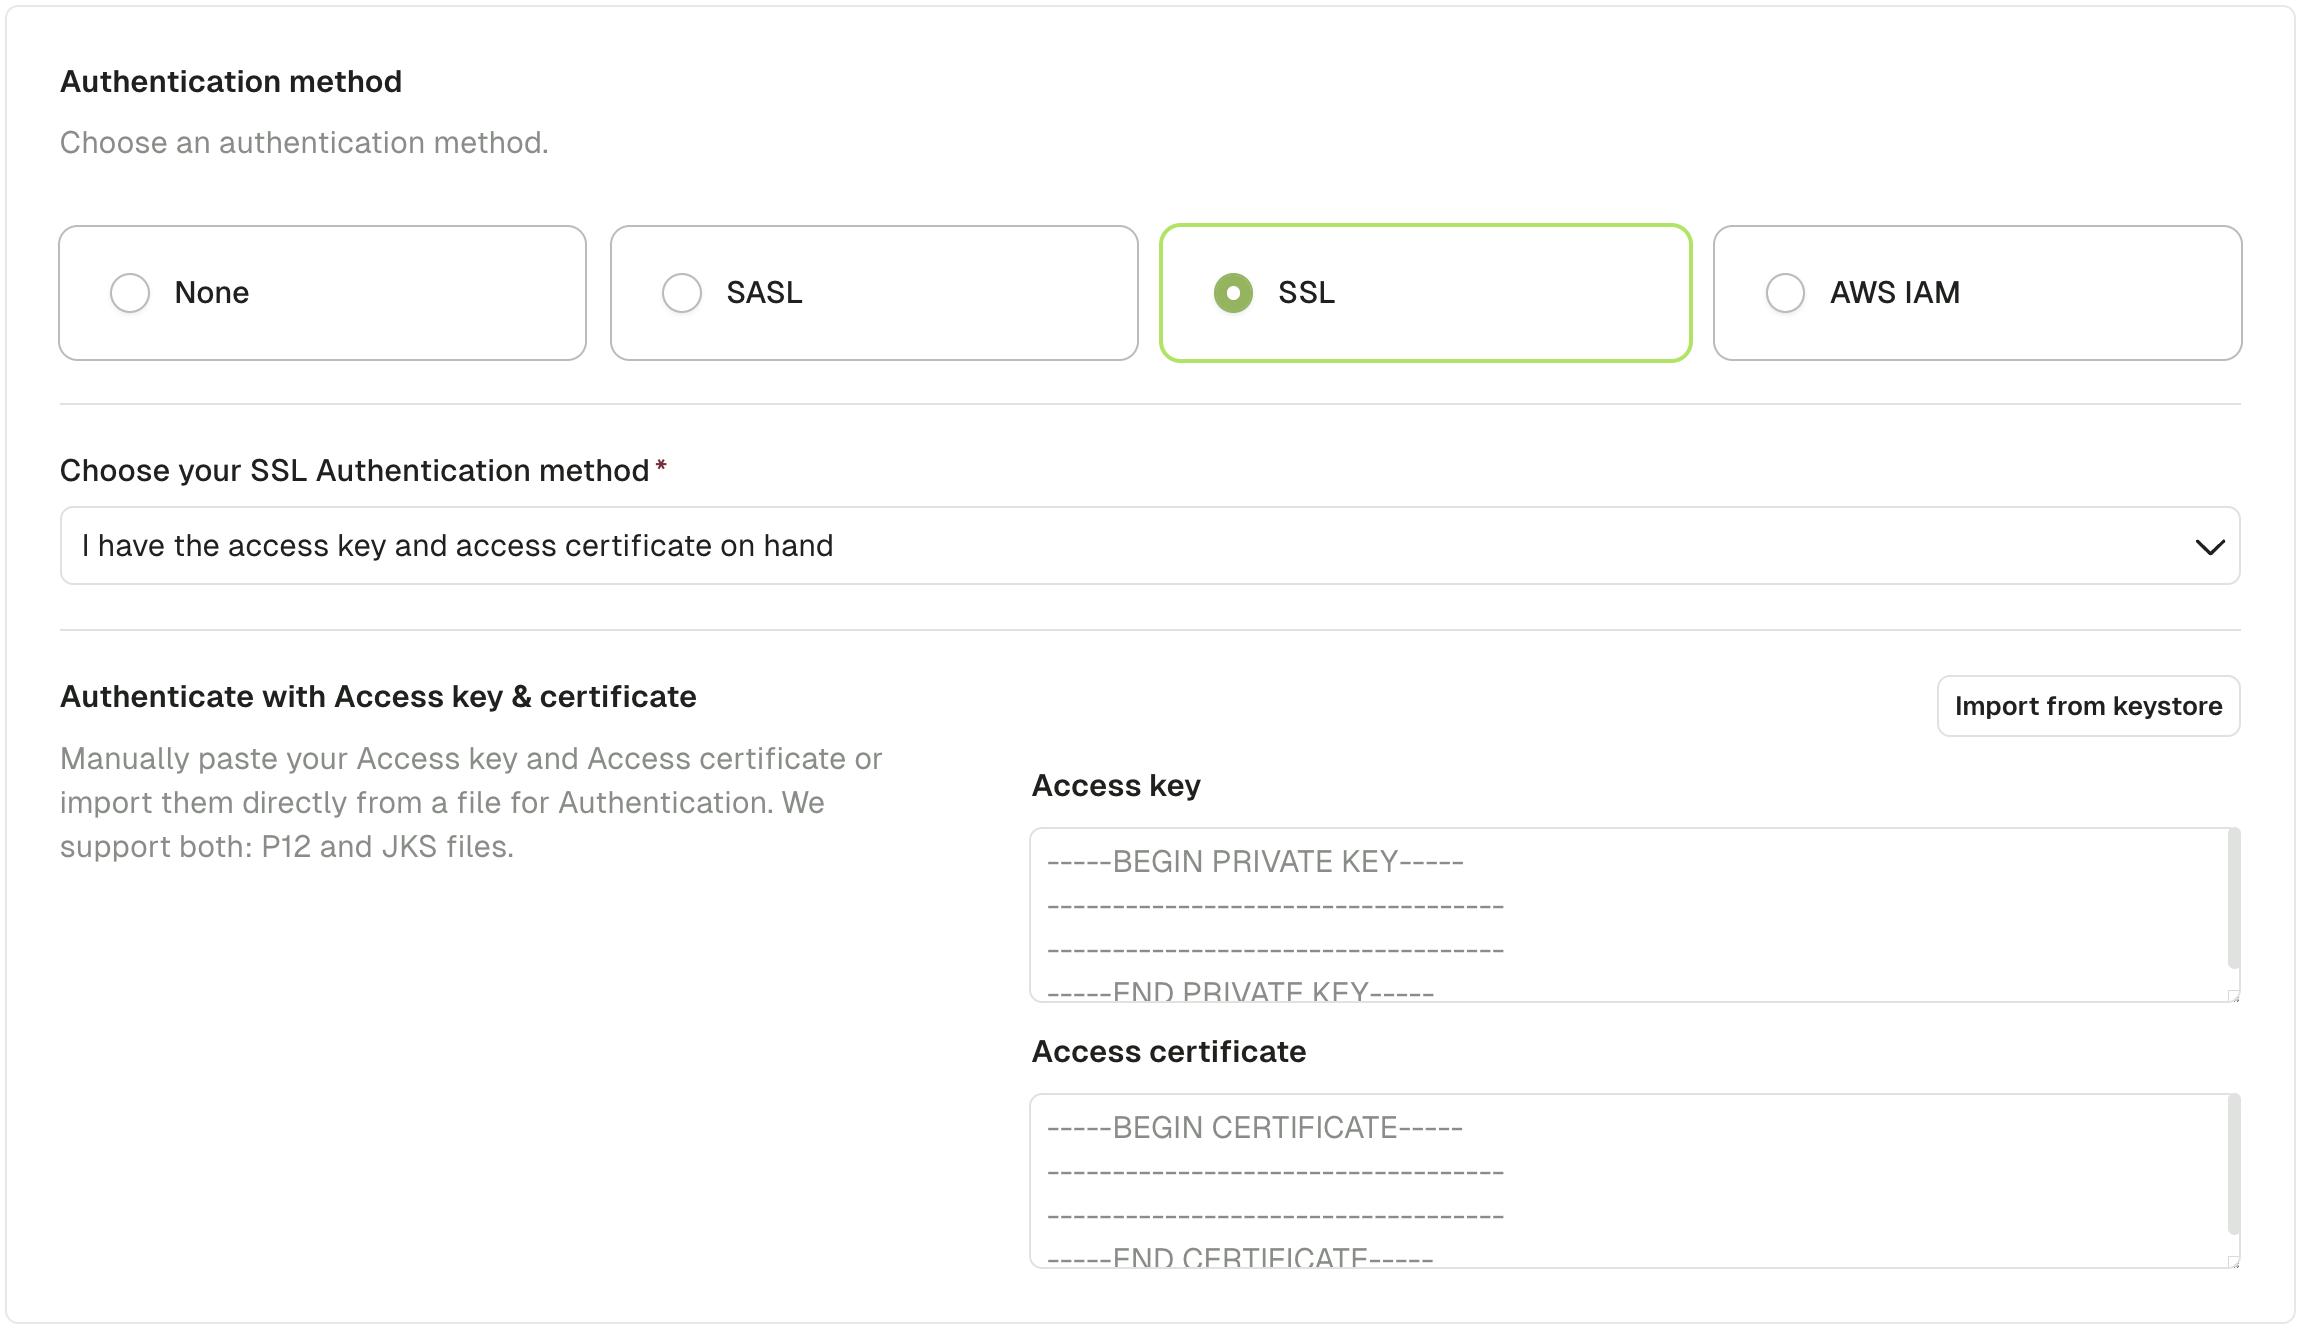 Fill in the required keystore password and key password and click "Import".
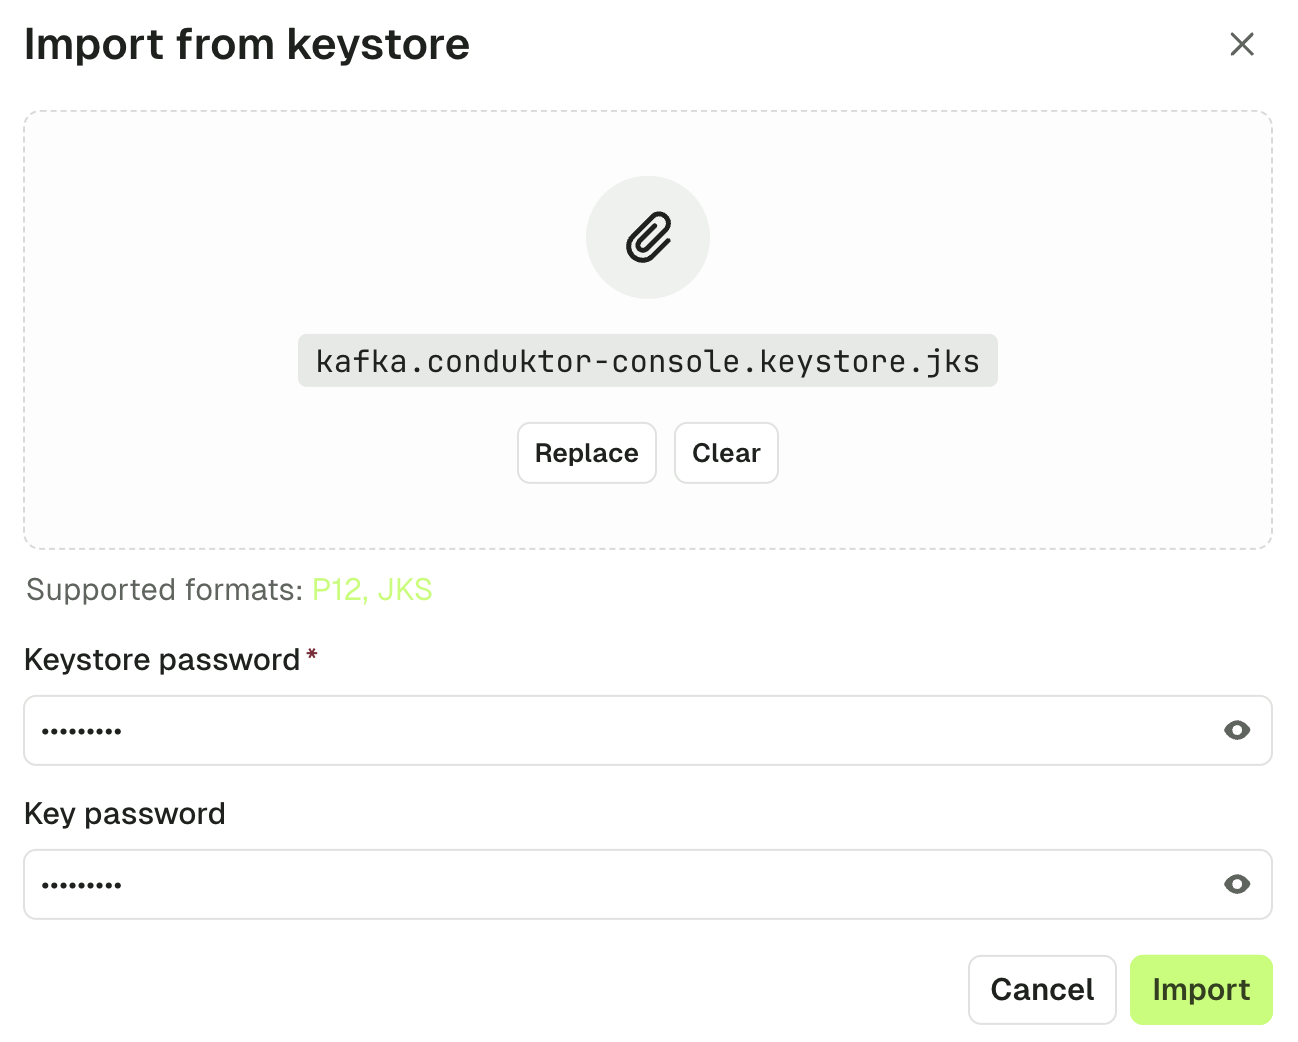 You'll get back to the cluster screen with the content of your keystore extracted into Access key and Access certificate.
 #### Use the UI (Access key and access certificate method)
Your Kafka admin or your Kafka provider gave you 2 files for authentication.
* An Access key (`.key` file)
* An Access certificate (`.pem` or `.crt` file)
Here's an example with Aiven:
#### Use the UI (Access key and access certificate method)
Your Kafka admin or your Kafka provider gave you 2 files for authentication.
* An Access key (`.key` file)
* An Access certificate (`.pem` or `.crt` file)
Here's an example with Aiven:
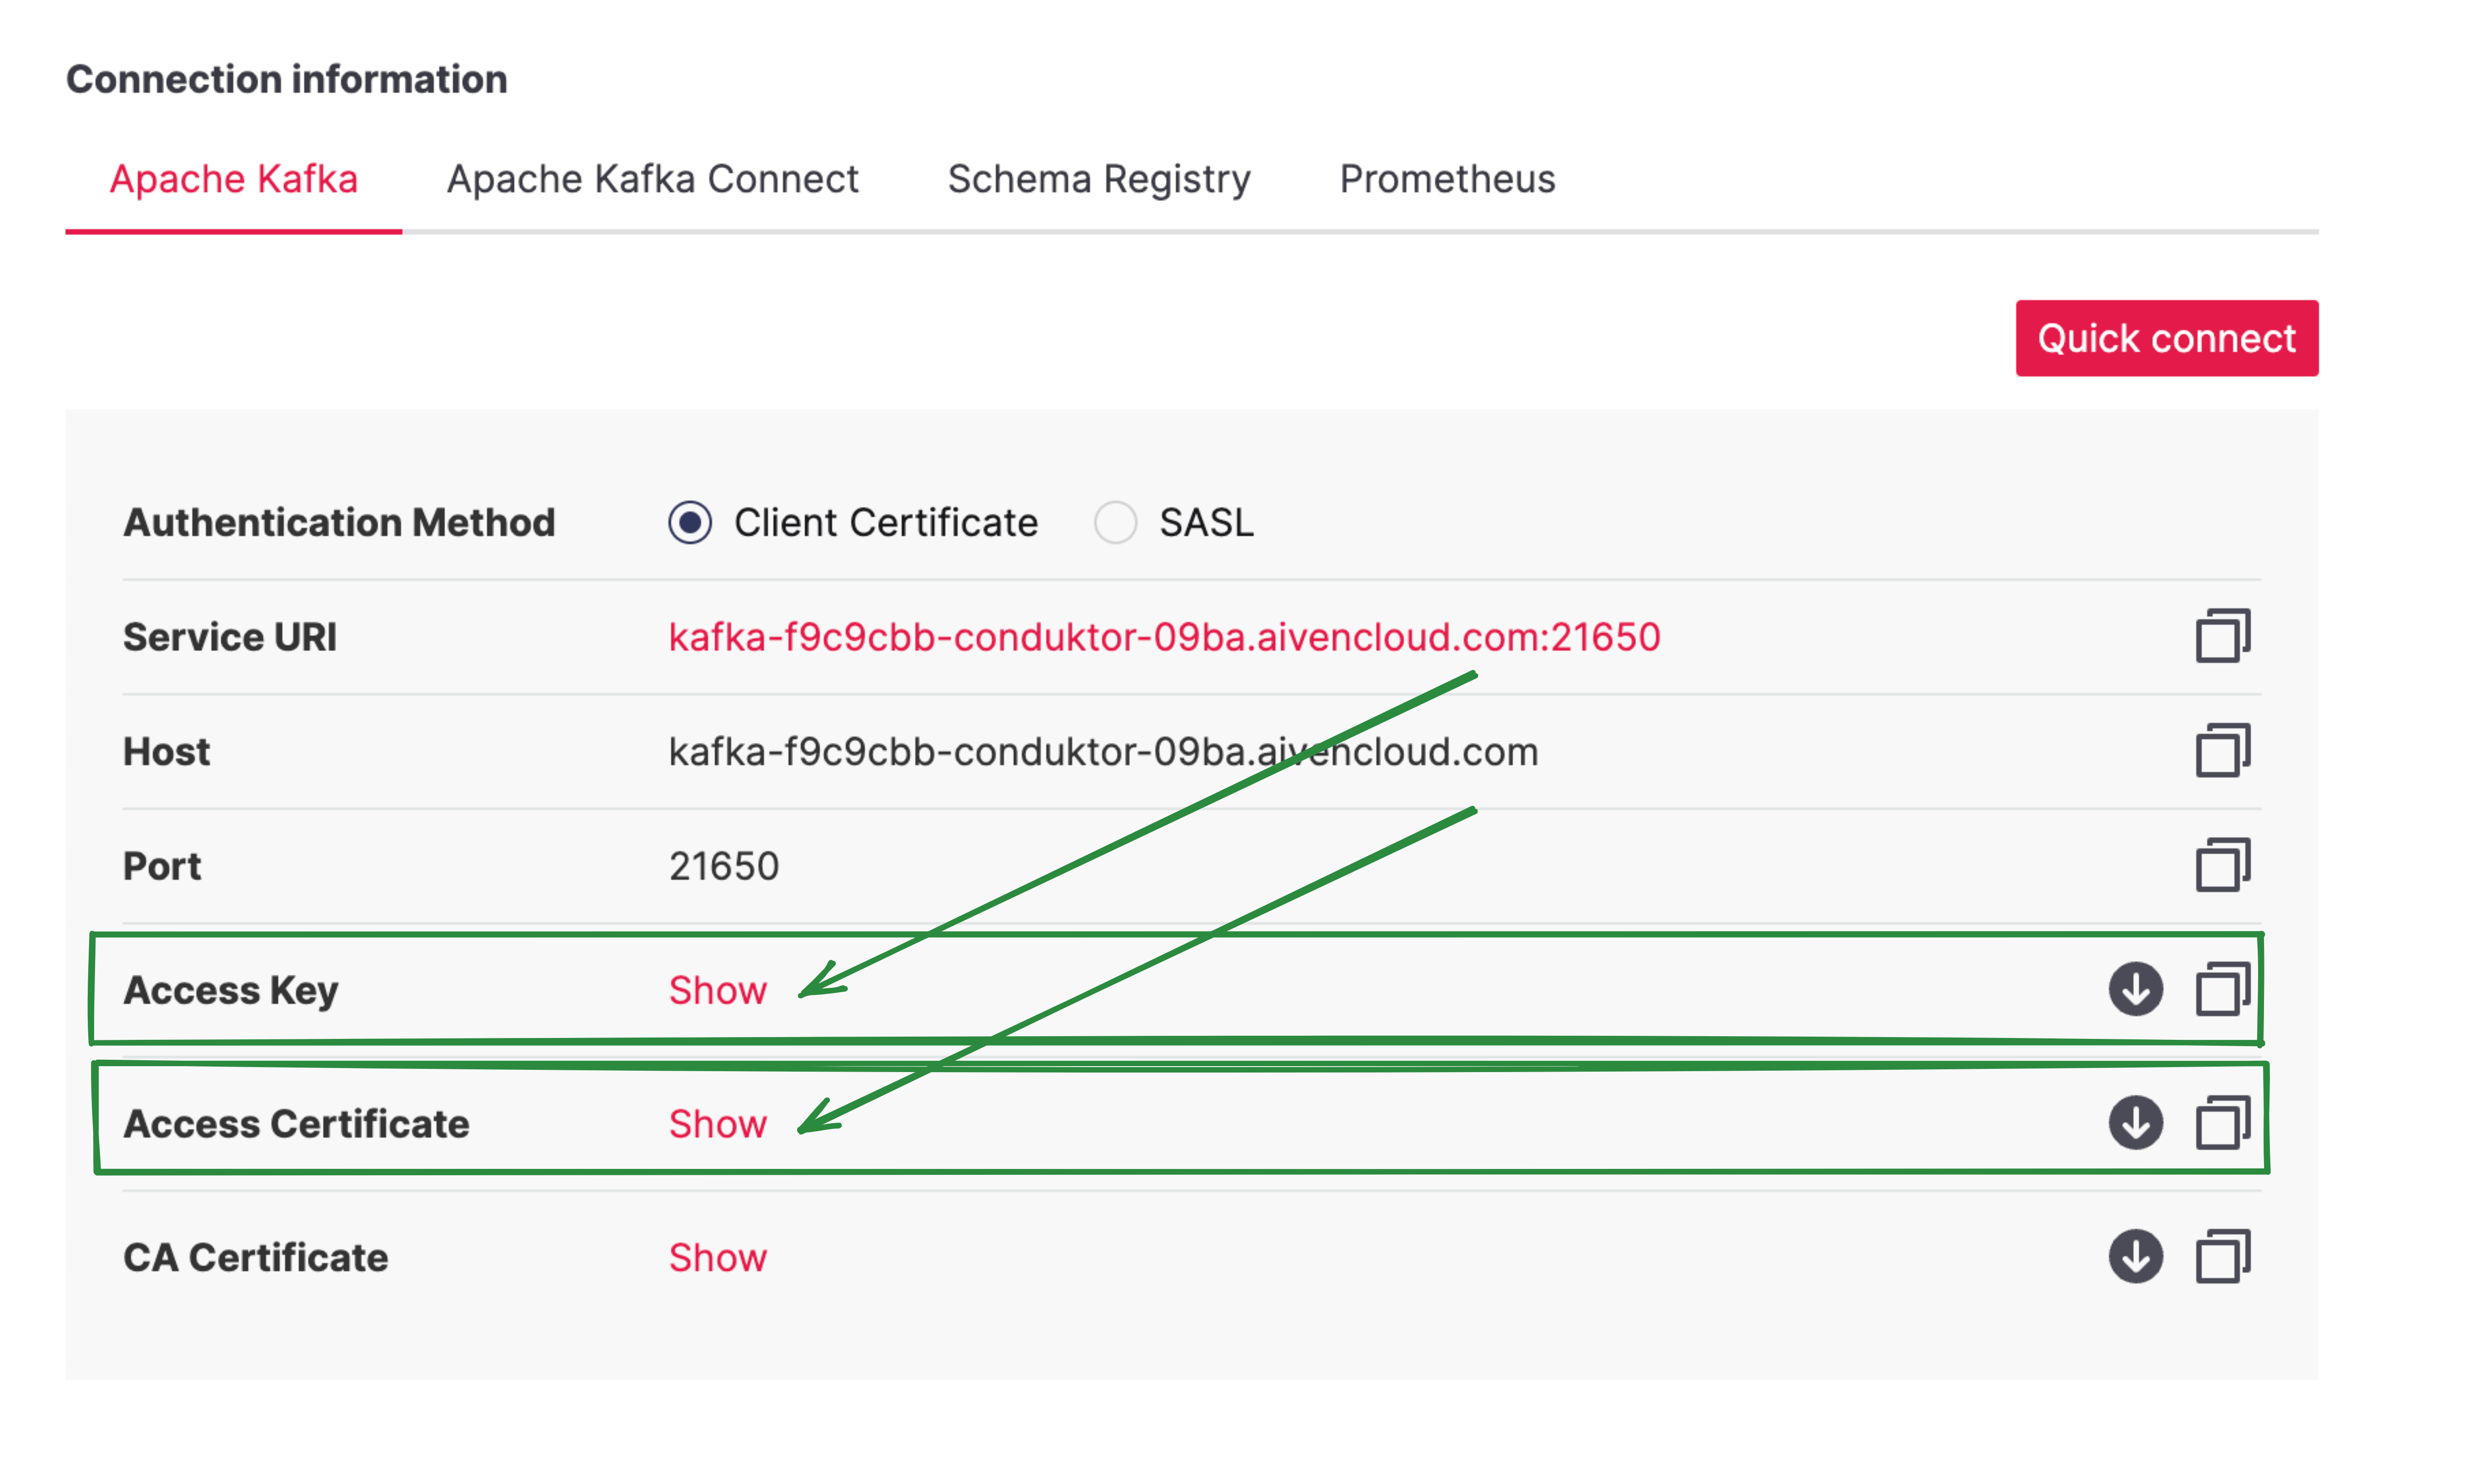 You can paste the contents of the two files into Conduktor or [import from keystore](#use-the-ui-keystore-method).
#### Use volume mount
You can mount the keystore file in the `conduktor-console` image:
```yaml theme={null}
services:
conduktor-console:
image: conduktor/conduktor-console
ports:
- 8080:8080
volumes:
- type: bind
source: ./keystore.jks
target: /opt/conduktor/certs/keystore.jks
read_only: true
```
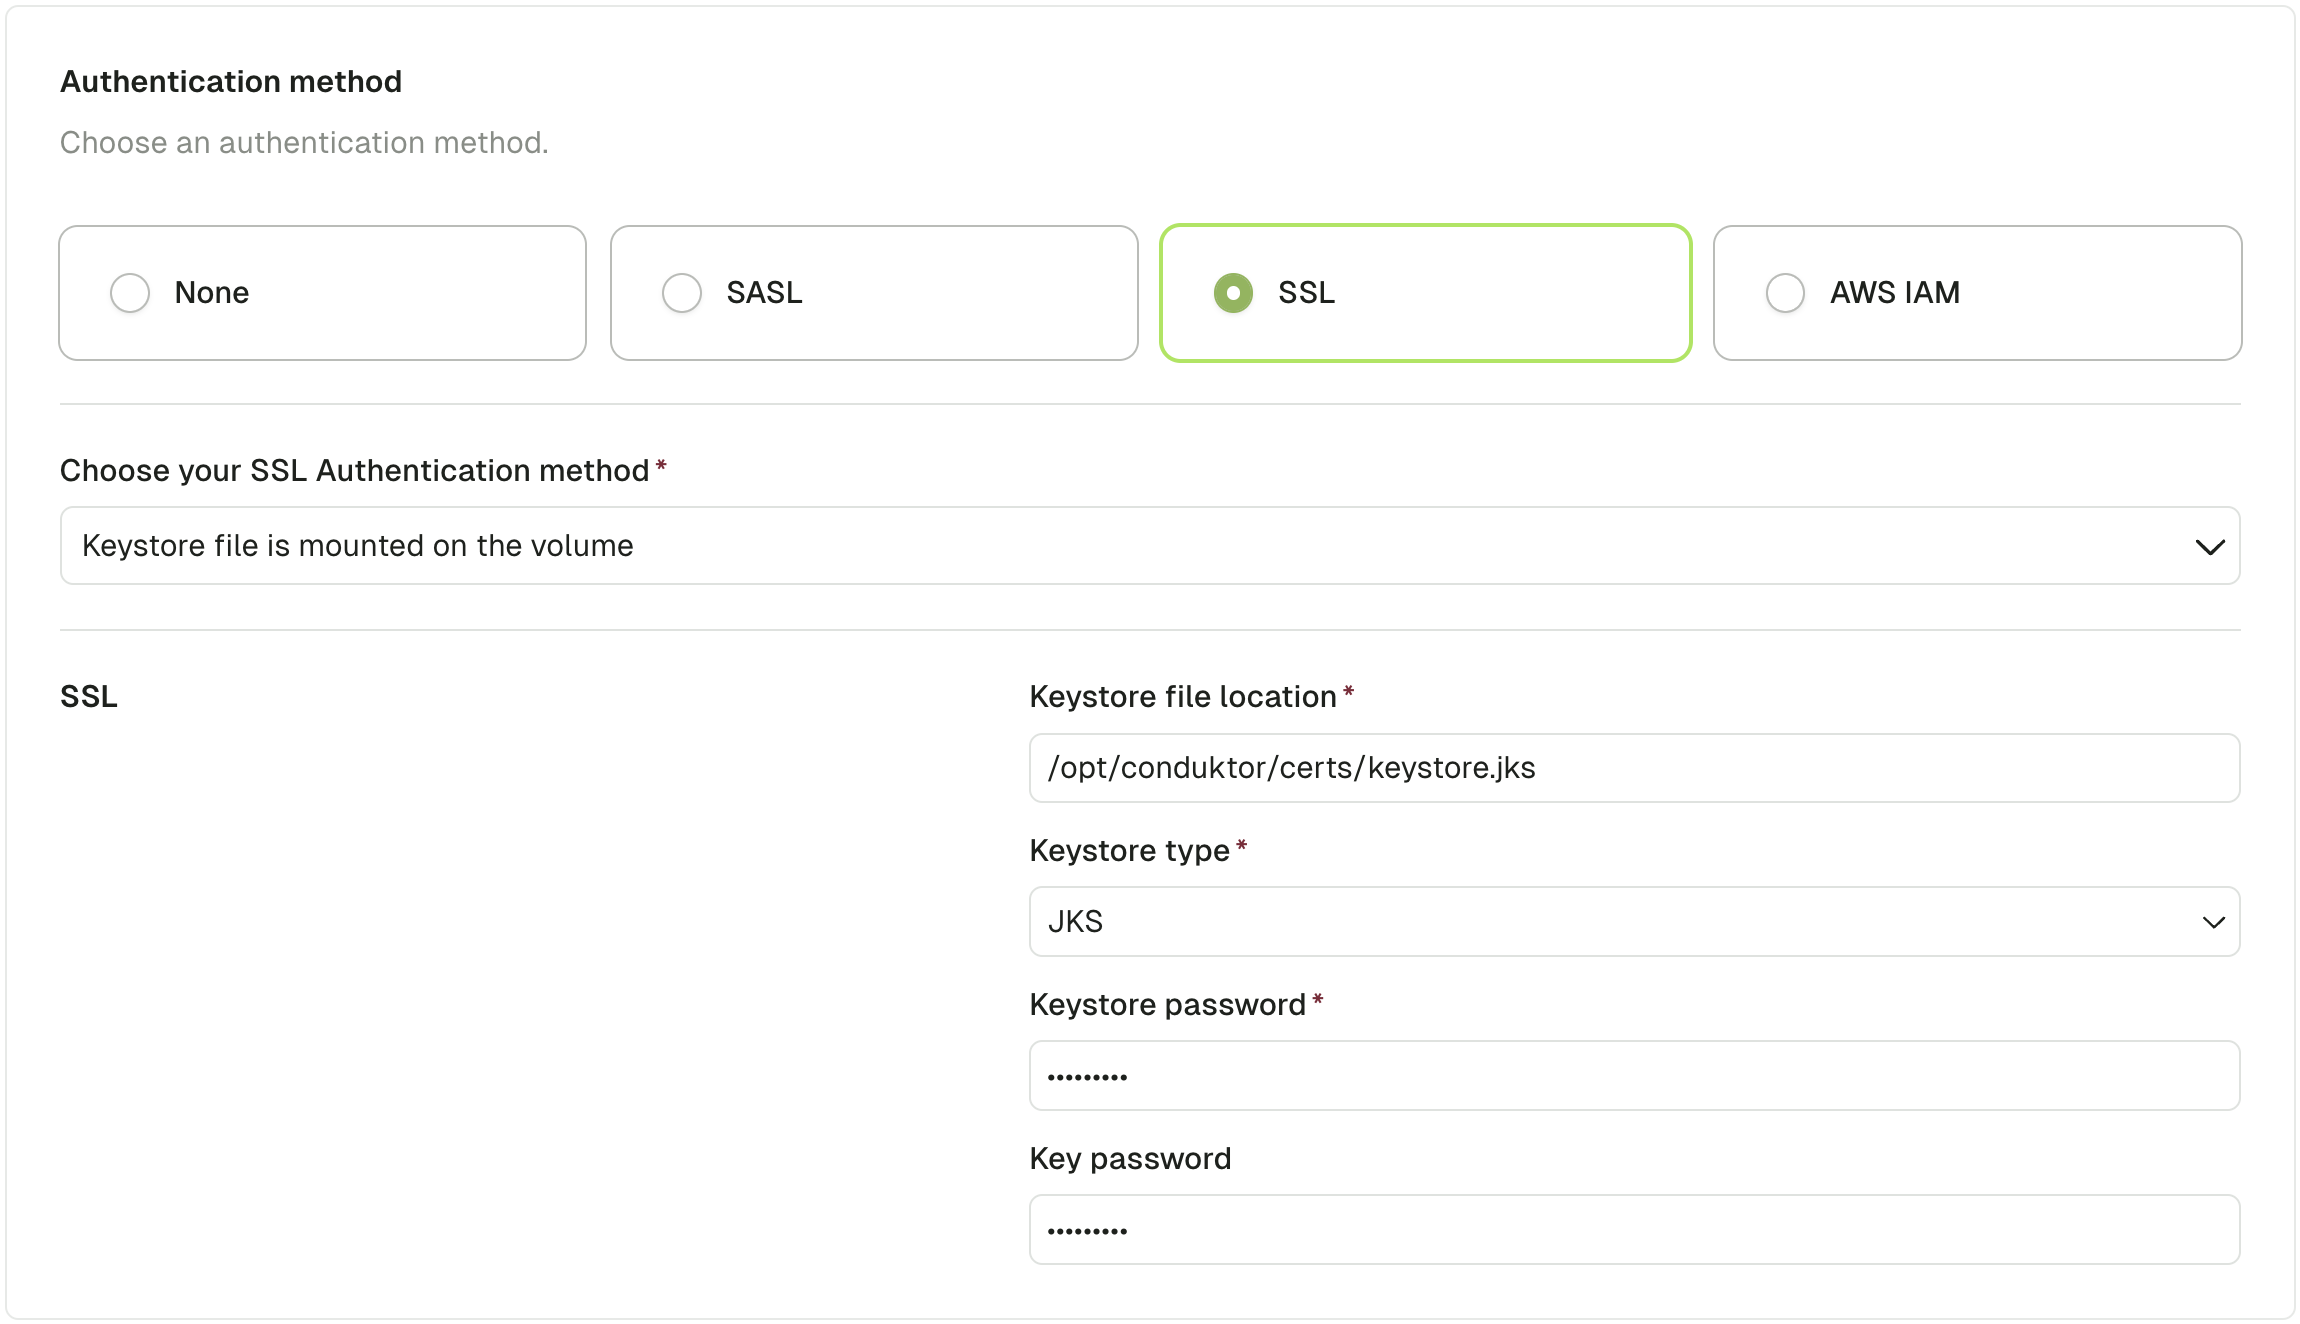
Then from the UI, choose the SSL Authentication method **Keystore file is mounted on the volume** and fill in the required fields
You can paste the contents of the two files into Conduktor or [import from keystore](#use-the-ui-keystore-method).
#### Use volume mount
You can mount the keystore file in the `conduktor-console` image:
```yaml theme={null}
services:
conduktor-console:
image: conduktor/conduktor-console
ports:
- 8080:8080
volumes:
- type: bind
source: ./keystore.jks
target: /opt/conduktor/certs/keystore.jks
read_only: true
```
Then from the UI, choose the SSL Authentication method **Keystore file is mounted on the volume** and fill in the required fields
 ## Configure Postgres database
Conduktor Console **requires a Postgres database to store its state**.
### Postgres requirements
* Postgres version 13 or higher
* Provided connection role should have grant `ALL PRIVILEGES` on the configured database. Console should be able to create/update/delete schemas and tables on the database.
**Minimum specifications for small or testing environments only:**
* 1-2 vCPU, 1 GB of RAM, and 10 GB of disk
For **production deployments**, please refer to our [comprehensive PostgreSQL Sizing Guide](/guide/conduktor-in-production/deploy-artifacts/deploy-console/postgres-sizing) which provides tier-based recommendations for AWS, GCP, and Azure to avoid performance issues like IOPS throttling, CPU spikes, and memory exhaustion.
If you want to use AWS RDS or AWS Aurora as a database with Console, consider the following: Console will not work with all PostgreSQL engines within RDS, it will only work with engine versions 14.8+ / 15.3+ (other versions are not fully supported).
### Database configuration properties
* `database` : is a key/value configuration consisting of:
* `database.url` : database connection url in the format `[jdbc:]postgresql://[user[:password]@][[netloc][:port],...][/dbname][?param1=value1&...]`
* `database.hosts[].host` : Postgresql server hosts name
* `database.hosts[].port` : Postgresql server ports
* `database.host` : Postgresql server host name (Deprecated. Use `database.hosts` instead)
* `database.port` : Postgresql server port (Deprecated. Use `database.hosts` instead)
* `database.name` : Database name
* `database.username` : Database login role
* `database.password` : Database login password
* `database.connection_timeout` : Connection timeout option in seconds
#### URL format
Console supports both, the standard [PostgreSQL URL](https://www.postgresql.org/docs/current/libpq-connect.html#LIBPQ-CONNSTRING-URIS) and [JDBC PostgreSQL](https://jdbc.postgresql.org/documentation/use/#connecting-to-the-database) .
Connection username and password can be provided in the URL as basic authentication or as parameters.
```yaml theme={null}
database:
url: 'jdbc:postgresql://user:password@host:5432/database' # or 'postgresql://host:5432/database?user=user&password=password'
```
### SSL support
By default, Console will try to connect to the database using SSL mode `prefer`. We plan to make this configurable in the future along with database certificate.
### Setup
There are several options available when configuring an external database:
1. From a single connection URL
* With the `CDK_DATABASE_URL` environment variable.
* With the `database.url` configuration field.
In either case, this connection url is using a standard PostgreSQL url in the format `[jdbc:]postgresql://[user[:password]@][[netloc][:port],...][/dbname][?param1=value1&...]`
2. From decomposed configuration fields
* With the `CDK_DATABASE_*` env vars.
* With the `database.*` on configuration file.
```yaml theme={null}
database:
host: 'host'
port: 5432
name: 'database'
username: 'user'
password: 'password'
connection_timeout: 30 # in seconds
```
#### Example
```shell theme={null}
docker run --rm \
-p "8080:8080" \
-e CDK_DATABASE_URL="postgresql://user:password@host:5432/database" \
-e LICENSE_KEY="" \
conduktor/conduktor-console:latest
```
* If all connection URLs and decomposed configuration fields are provided, **the decomposed configuration fields take priority**.
* If an invalid connection URL or a mandatory configuration field (`host`, `username` or `name`) is missing, Conduktor will fail gracefully with a meaningful error message.
* **Before Console v1.2.0**, the `EMBEDDED_POSTGRES=false` was mandatory to enable external Postgresql configuration.
### Multi-host configuration
If you have a multi-host setup, you can configure the database connection with a list of hosts. Conduktor uses a PostgreSQL JDBC driver to connect to the database that supports [multiple hosts in the connection url](https://jdbc.postgresql.org/documentation/use/#connection-fail-over) .
To configure a multi-host setup, you can use the `database.url` configuration field with a list of hosts separated by commas:
```yaml theme={null}
database:
url: 'jdbc:postgresql://user:password@host1:5432,host2:5432/database'
```
or with decomposed configuration fields:
```yaml theme={null}
database:
hosts:
- host: 'host1'
port: 5432
- host: 'host2'
port: 5432
name: 'database'
username: 'user'
password: 'password'
connection_timeout: 30 # in seconds
```
You can also provide [JDBC connection parameter](https://jdbc.postgresql.org/documentation/use/#connection-parameters) `targetServerType` to specify the target server type for the connection:
```yaml theme={null}
database:
url: 'jdbc:postgresql://user:password@host1:5432,host2:5432/database?targetServerType=primary'
```
Nearly all `targetServerType` are supported: `any`, `primary`, `master`, `slave`, `secondary`, `preferSlave`, `preferSecondary` and `preferPrimary`.
## Debug Console
To troubleshoot Console:
1. Verify that Console is up and running.
2. Check the logs and send them to our support team if necessary.
### 1. Verify that Conduktor is up and running
First, verify that all the components are running.
```bash title="Get containers status" theme={null}
docker ps
```
```txt title="Output" theme={null}
NAME IMAGE COMMAND SERVICE CREATED STATUS PORTS
conduktor-console conduktor/conduktor-console:1.21.0 "/__cacert_entrypoin…" conduktor-console 10 minutes ago Up 9 minutes (healthy) 0.0.0.0:8080->8080/tcp
conduktor-monitoring conduktor/conduktor-console-cortex:1.21.0 "/opt/conduktor/scri…" conduktor-monitoring 10 minutes ago Up 10 minutes (healthy) 0.0.0.0:9009->9009/tcp, 0.0.0.0:9090->9090/tcp
postgres postgres:15.1 "docker-entrypoint.s…" postgres 10 minutes ago Up 10 minutes 0.0.0.0:5432->5432/tcp
```
If you're using an external Kafka installation and external database, you will only need to verify that the `conduktor-console` container is showing `healthy` as the `STATUS`.
If Console is showing an "exited" status, check the Docker logs by running the command (with the appropriate container name):
```bash title="Get container logs" theme={null}
docker logs conduktor-console
```
You can save these logs in a file:
```bash title="Store logs in a file" theme={null}
docker logs conduktor-console >& docker-logs-output.txt
```
To get the status of the Conduktor Console pod in Kubernetes, you can run the following command (with the correct namespace, if any):
```bash title="Get containers status" theme={null}
kubectl get pod --namespace conduktor
```
```txt title="Output" theme={null}
NAME READY STATUS RESTARTS AGE
console-instance-cortex-5d85d5cfb4-qcxhs 1/1 Running 0 2m4s
console-instance-747d5ffc7b-gcpkx 1/1 Running 0 2m4s
```
The pod status is available in the **STATUS** column.
### 2. Get the logs and send them to support
Logs are kept in `/var/conduktor/log`. You can see them using:
```sh title="List log files" theme={null}
ls /var/conduktor/log/
```
```txt title="Output" theme={null}
console-stdout---supervisor-umscgn8w.log proxy proxy-stdout---supervisor-2gim6er7.log supervisord.log
platform_api-stdout---supervisor-cqvwnsqi.log proxy-stderr---supervisor-8i0bjkaz.log startup.log
```
The best here is to simply bring all the logs to your local machine (in PWD) by running:
```sh theme={null}
docker compose cp conduktor-console:/var/conduktor/log .
```
Then send these logs to our[support team](https://support.conduktor.io/hc/en-gb/requests/new) . If you've contacted us before, [log into your account and create a ticket](https://conduktor-support.zendesk.com/auth/v2/login/signin?return_to=https%3A%2F%2Fsupport.conduktor.io%2Fhc%2Fen-gb\&theme=hc\&locale=en-gb\&brand_id=15739556902161\&auth_origin=15739556902161%2Ctrue%2Ctrue) .
## Configuration properties and environment variables
For the complete list of variables, see the [Console environment variables reference](/guide/conduktor-in-production/deploy-artifacts/deploy-console/environment-variables).
## Configure HTTP proxy
Specify the proxy settings for Conduktor to use when accessing Internet. The HTTP proxy works for both HTTP and [HTTPS](#configure-https) connection.
There are five properties you can set to specify the proxy that will be used by the HTTP protocol handler:
* `CDK_HTTP_PROXY_HOST`: the host name of the proxy server
* `CDK_HTTP_PROXY_PORT`: the port number. Default value is 80.
* `CDK_HTTP_NON_PROXY_HOSTS`: a list of hosts that should be reached directly, bypassing the proxy. This is a list of patterns separated by `|`. The patterns may start or end with a `*` for wildcards, we do not support `/`. Any host matching one of these patterns will be reached through a direct connection instead of through a proxy.
* `CDK_HTTP_PROXY_USERNAME`: the proxy username
* `CDK_HTTP_PROXY_PASSWORD`: the proxy password
### Example
```yaml theme={null}
services:
conduktor-console:
image: conduktor/conduktor-console
ports:
- 8080:8080
environment:
CDK_HTTP_PROXY_HOST: "proxy.mydomain.com"
CDK_HTTP_PROXY_PORT: 8000
CDK_HTTP_NON_PROXY_HOSTS: "*.mydomain.com"
```
### Configure HTTPS
To configure Conduktor Console to respond to HTTPS requests, you have to define a certificate and a private key.
The server certificate is a public entity that's sent to every client that connects to the server and it should be provided as a PEM file.
Configuration properties are:
* `platform.https.cert.path` or environment variable `CDK_PLATFORM_HTTPS_CERT_PATH`: the path to server certificate file
* `platform.https.key.path` or environment variable `CDK_PLATFORM_HTTPS_KEY_PATH`: the path to server private key file
Both the certificate and private key files have to allow read from user `conduktor-platform` (UID 10001 GID 0) but don't need to be readable system-wide.
#### Sample configuration using docker-compose
In this example, server certificate and key (**server.crt** and **server.key**) are stored in the same directory as the `docker-compose` file.
```yaml theme={null}
services:
conduktor-console:
image: conduktor/conduktor-console
ports:
- 8080:8080
volumes:
- type: bind
source: ./server.crt
target: /opt/conduktor/certs/server.crt
read_only: true
- type: bind
source: ./server.key
target: /opt/conduktor/certs/server.key
read_only: true
environment:
CDK_PLATFORM_HTTPS_CERT_PATH: '/opt/conduktor/certs/server.crt'
CDK_PLATFORM_HTTPS_KEY_PATH: '/opt/conduktor/certs/server.key'
```
If the monitoring image `conduktor/conduktor-console-cortex` is running as well, you have to provide the CA public certificate to the monitoring image to allow metrics scraping on HTTPS.
```yaml theme={null}
services:
conduktor-console:
image: conduktor/conduktor-console
ports:
- 8080:8080
volumes:
- type: bind
source: ./server.crt
target: /opt/conduktor/certs/server.crt
read_only: true
- type: bind
source: ./server.key
target: /opt/conduktor/certs/server.key
read_only: true
environment:
# HTTPS configuration
CDK_PLATFORM_HTTPS_CERT_PATH: '/opt/conduktor/certs/server.crt'
CDK_PLATFORM_HTTPS_KEY_PATH: '/opt/conduktor/certs/server.key'
# monitoring configuration
CDK_MONITORING_CORTEX-URL: http://conduktor-monitoring:9009/
CDK_MONITORING_ALERT-MANAGER-URL: http://conduktor-monitoring:9009/
CDK_MONITORING_CALLBACK-URL: https://conduktor-console:8080/monitoring/api/
CDK_MONITORING_NOTIFICATIONS-CALLBACK-URL: http://localhost:8080
conduktor-monitoring:
image: conduktor/conduktor-console-cortex
volumes:
- type: bind
source: ./server.crt
target: /opt/conduktor/certs/server.crt
read_only: true
environment:
CDK_CONSOLE-URL: "https://conduktor-console:8080"
CDK_SCRAPER_SKIPSSLCHECK: "false" # can be set to true if you don't want to check the certificate
CDK_SCRAPER_CAFILE: "/opt/conduktor/certs/server.crt"
```
## Configure Postgres database
Conduktor Console **requires a Postgres database to store its state**.
### Postgres requirements
* Postgres version 13 or higher
* Provided connection role should have grant `ALL PRIVILEGES` on the configured database. Console should be able to create/update/delete schemas and tables on the database.
**Minimum specifications for small or testing environments only:**
* 1-2 vCPU, 1 GB of RAM, and 10 GB of disk
For **production deployments**, please refer to our [comprehensive PostgreSQL Sizing Guide](/guide/conduktor-in-production/deploy-artifacts/deploy-console/postgres-sizing) which provides tier-based recommendations for AWS, GCP, and Azure to avoid performance issues like IOPS throttling, CPU spikes, and memory exhaustion.
If you want to use AWS RDS or AWS Aurora as a database with Console, consider the following: Console will not work with all PostgreSQL engines within RDS, it will only work with engine versions 14.8+ / 15.3+ (other versions are not fully supported).
### Database configuration properties
* `database` : is a key/value configuration consisting of:
* `database.url` : database connection url in the format `[jdbc:]postgresql://[user[:password]@][[netloc][:port],...][/dbname][?param1=value1&...]`
* `database.hosts[].host` : Postgresql server hosts name
* `database.hosts[].port` : Postgresql server ports
* `database.host` : Postgresql server host name (Deprecated. Use `database.hosts` instead)
* `database.port` : Postgresql server port (Deprecated. Use `database.hosts` instead)
* `database.name` : Database name
* `database.username` : Database login role
* `database.password` : Database login password
* `database.connection_timeout` : Connection timeout option in seconds
#### URL format
Console supports both, the standard [PostgreSQL URL](https://www.postgresql.org/docs/current/libpq-connect.html#LIBPQ-CONNSTRING-URIS) and [JDBC PostgreSQL](https://jdbc.postgresql.org/documentation/use/#connecting-to-the-database) .
Connection username and password can be provided in the URL as basic authentication or as parameters.
```yaml theme={null}
database:
url: 'jdbc:postgresql://user:password@host:5432/database' # or 'postgresql://host:5432/database?user=user&password=password'
```
### SSL support
By default, Console will try to connect to the database using SSL mode `prefer`. We plan to make this configurable in the future along with database certificate.
### Setup
There are several options available when configuring an external database:
1. From a single connection URL
* With the `CDK_DATABASE_URL` environment variable.
* With the `database.url` configuration field.
In either case, this connection url is using a standard PostgreSQL url in the format `[jdbc:]postgresql://[user[:password]@][[netloc][:port],...][/dbname][?param1=value1&...]`
2. From decomposed configuration fields
* With the `CDK_DATABASE_*` env vars.
* With the `database.*` on configuration file.
```yaml theme={null}
database:
host: 'host'
port: 5432
name: 'database'
username: 'user'
password: 'password'
connection_timeout: 30 # in seconds
```
#### Example
```shell theme={null}
docker run --rm \
-p "8080:8080" \
-e CDK_DATABASE_URL="postgresql://user:password@host:5432/database" \
-e LICENSE_KEY="" \
conduktor/conduktor-console:latest
```
* If all connection URLs and decomposed configuration fields are provided, **the decomposed configuration fields take priority**.
* If an invalid connection URL or a mandatory configuration field (`host`, `username` or `name`) is missing, Conduktor will fail gracefully with a meaningful error message.
* **Before Console v1.2.0**, the `EMBEDDED_POSTGRES=false` was mandatory to enable external Postgresql configuration.
### Multi-host configuration
If you have a multi-host setup, you can configure the database connection with a list of hosts. Conduktor uses a PostgreSQL JDBC driver to connect to the database that supports [multiple hosts in the connection url](https://jdbc.postgresql.org/documentation/use/#connection-fail-over) .
To configure a multi-host setup, you can use the `database.url` configuration field with a list of hosts separated by commas:
```yaml theme={null}
database:
url: 'jdbc:postgresql://user:password@host1:5432,host2:5432/database'
```
or with decomposed configuration fields:
```yaml theme={null}
database:
hosts:
- host: 'host1'
port: 5432
- host: 'host2'
port: 5432
name: 'database'
username: 'user'
password: 'password'
connection_timeout: 30 # in seconds
```
You can also provide [JDBC connection parameter](https://jdbc.postgresql.org/documentation/use/#connection-parameters) `targetServerType` to specify the target server type for the connection:
```yaml theme={null}
database:
url: 'jdbc:postgresql://user:password@host1:5432,host2:5432/database?targetServerType=primary'
```
Nearly all `targetServerType` are supported: `any`, `primary`, `master`, `slave`, `secondary`, `preferSlave`, `preferSecondary` and `preferPrimary`.
## Debug Console
To troubleshoot Console:
1. Verify that Console is up and running.
2. Check the logs and send them to our support team if necessary.
### 1. Verify that Conduktor is up and running
First, verify that all the components are running.
```bash title="Get containers status" theme={null}
docker ps
```
```txt title="Output" theme={null}
NAME IMAGE COMMAND SERVICE CREATED STATUS PORTS
conduktor-console conduktor/conduktor-console:1.21.0 "/__cacert_entrypoin…" conduktor-console 10 minutes ago Up 9 minutes (healthy) 0.0.0.0:8080->8080/tcp
conduktor-monitoring conduktor/conduktor-console-cortex:1.21.0 "/opt/conduktor/scri…" conduktor-monitoring 10 minutes ago Up 10 minutes (healthy) 0.0.0.0:9009->9009/tcp, 0.0.0.0:9090->9090/tcp
postgres postgres:15.1 "docker-entrypoint.s…" postgres 10 minutes ago Up 10 minutes 0.0.0.0:5432->5432/tcp
```
If you're using an external Kafka installation and external database, you will only need to verify that the `conduktor-console` container is showing `healthy` as the `STATUS`.
If Console is showing an "exited" status, check the Docker logs by running the command (with the appropriate container name):
```bash title="Get container logs" theme={null}
docker logs conduktor-console
```
You can save these logs in a file:
```bash title="Store logs in a file" theme={null}
docker logs conduktor-console >& docker-logs-output.txt
```
To get the status of the Conduktor Console pod in Kubernetes, you can run the following command (with the correct namespace, if any):
```bash title="Get containers status" theme={null}
kubectl get pod --namespace conduktor
```
```txt title="Output" theme={null}
NAME READY STATUS RESTARTS AGE
console-instance-cortex-5d85d5cfb4-qcxhs 1/1 Running 0 2m4s
console-instance-747d5ffc7b-gcpkx 1/1 Running 0 2m4s
```
The pod status is available in the **STATUS** column.
### 2. Get the logs and send them to support
Logs are kept in `/var/conduktor/log`. You can see them using:
```sh title="List log files" theme={null}
ls /var/conduktor/log/
```
```txt title="Output" theme={null}
console-stdout---supervisor-umscgn8w.log proxy proxy-stdout---supervisor-2gim6er7.log supervisord.log
platform_api-stdout---supervisor-cqvwnsqi.log proxy-stderr---supervisor-8i0bjkaz.log startup.log
```
The best here is to simply bring all the logs to your local machine (in PWD) by running:
```sh theme={null}
docker compose cp conduktor-console:/var/conduktor/log .
```
Then send these logs to our[support team](https://support.conduktor.io/hc/en-gb/requests/new) . If you've contacted us before, [log into your account and create a ticket](https://conduktor-support.zendesk.com/auth/v2/login/signin?return_to=https%3A%2F%2Fsupport.conduktor.io%2Fhc%2Fen-gb\&theme=hc\&locale=en-gb\&brand_id=15739556902161\&auth_origin=15739556902161%2Ctrue%2Ctrue) .
## Configuration properties and environment variables
For the complete list of variables, see the [Console environment variables reference](/guide/conduktor-in-production/deploy-artifacts/deploy-console/environment-variables).
## Configure HTTP proxy
Specify the proxy settings for Conduktor to use when accessing Internet. The HTTP proxy works for both HTTP and [HTTPS](#configure-https) connection.
There are five properties you can set to specify the proxy that will be used by the HTTP protocol handler:
* `CDK_HTTP_PROXY_HOST`: the host name of the proxy server
* `CDK_HTTP_PROXY_PORT`: the port number. Default value is 80.
* `CDK_HTTP_NON_PROXY_HOSTS`: a list of hosts that should be reached directly, bypassing the proxy. This is a list of patterns separated by `|`. The patterns may start or end with a `*` for wildcards, we do not support `/`. Any host matching one of these patterns will be reached through a direct connection instead of through a proxy.
* `CDK_HTTP_PROXY_USERNAME`: the proxy username
* `CDK_HTTP_PROXY_PASSWORD`: the proxy password
### Example
```yaml theme={null}
services:
conduktor-console:
image: conduktor/conduktor-console
ports:
- 8080:8080
environment:
CDK_HTTP_PROXY_HOST: "proxy.mydomain.com"
CDK_HTTP_PROXY_PORT: 8000
CDK_HTTP_NON_PROXY_HOSTS: "*.mydomain.com"
```
### Configure HTTPS
To configure Conduktor Console to respond to HTTPS requests, you have to define a certificate and a private key.
The server certificate is a public entity that's sent to every client that connects to the server and it should be provided as a PEM file.
Configuration properties are:
* `platform.https.cert.path` or environment variable `CDK_PLATFORM_HTTPS_CERT_PATH`: the path to server certificate file
* `platform.https.key.path` or environment variable `CDK_PLATFORM_HTTPS_KEY_PATH`: the path to server private key file
Both the certificate and private key files have to allow read from user `conduktor-platform` (UID 10001 GID 0) but don't need to be readable system-wide.
#### Sample configuration using docker-compose
In this example, server certificate and key (**server.crt** and **server.key**) are stored in the same directory as the `docker-compose` file.
```yaml theme={null}
services:
conduktor-console:
image: conduktor/conduktor-console
ports:
- 8080:8080
volumes:
- type: bind
source: ./server.crt
target: /opt/conduktor/certs/server.crt
read_only: true
- type: bind
source: ./server.key
target: /opt/conduktor/certs/server.key
read_only: true
environment:
CDK_PLATFORM_HTTPS_CERT_PATH: '/opt/conduktor/certs/server.crt'
CDK_PLATFORM_HTTPS_KEY_PATH: '/opt/conduktor/certs/server.key'
```
If the monitoring image `conduktor/conduktor-console-cortex` is running as well, you have to provide the CA public certificate to the monitoring image to allow metrics scraping on HTTPS.
```yaml theme={null}
services:
conduktor-console:
image: conduktor/conduktor-console
ports:
- 8080:8080
volumes:
- type: bind
source: ./server.crt
target: /opt/conduktor/certs/server.crt
read_only: true
- type: bind
source: ./server.key
target: /opt/conduktor/certs/server.key
read_only: true
environment:
# HTTPS configuration
CDK_PLATFORM_HTTPS_CERT_PATH: '/opt/conduktor/certs/server.crt'
CDK_PLATFORM_HTTPS_KEY_PATH: '/opt/conduktor/certs/server.key'
# monitoring configuration
CDK_MONITORING_CORTEX-URL: http://conduktor-monitoring:9009/
CDK_MONITORING_ALERT-MANAGER-URL: http://conduktor-monitoring:9009/
CDK_MONITORING_CALLBACK-URL: https://conduktor-console:8080/monitoring/api/
CDK_MONITORING_NOTIFICATIONS-CALLBACK-URL: http://localhost:8080
conduktor-monitoring:
image: conduktor/conduktor-console-cortex
volumes:
- type: bind
source: ./server.crt
target: /opt/conduktor/certs/server.crt
read_only: true
environment:
CDK_CONSOLE-URL: "https://conduktor-console:8080"
CDK_SCRAPER_SKIPSSLCHECK: "false" # can be set to true if you don't want to check the certificate
CDK_SCRAPER_CAFILE: "/opt/conduktor/certs/server.crt"
```